Showing posts with label 3d model. Show all posts

Sunday, December 13, 2009

my first 3d model

I was browsing through my designs and i came to my first 3d model, the inspiration about this was a tutorial in illustrator (i just forgot the website), the tutorial was all about creating a basket of fruits, one effect illustrator can do is that it can act as a 3d vector (rotate effect), so i was thinking why not make the real 3d for it.

hope you like it.

software used:
swift3d v5

Read more from here DESIGNERSLANDMARK

Monday, November 30, 2009

Zbrush 3.5r2 review

All the mud's and the sculpting are paided off, the second release of zbrush 3.5 r2 has fixed some problems and put additional features. i want the new feature such as the new ZSheres 2 and ZSketch. New brushes such as Trim, Planar, Noise, Move, Spherical, Slide, Form, Flakes, and Crumple. For other features check it out below.

New Additions include:
* New “Auto Groups With UV” option added which allows for auto-grouping by mesh (shells) and UV (islands) combined continuity.
* Added option to allow object to rotate around its local center. To activate, press the “Align To Object” option in the Draw palette. Note: This button is stored when you save the custom config file.
* Added a 2nd Flatten brush (similar to the Flatten brush found in version ZBrush 3.1).
* A Preferences/LightBox option added to turn on or off LightBox at startup.

New Features Include:

* Increased smoothing strength of the default Smooth brush.
* Masking can now be applied with LazyMouse with or without Backtrack modes.
* Increased the tolerance to mouse/pen movement when assigning Hot Keys.
* The transparent button is now enabled even if the current tool contains only one subtool. This allows ghosted transparency to be activated when entering HD edit mode.
* The sampling value of the ZProject brush is now zero by default.

Fixes include:

* It is now possible to generate adaptive displacement and normal maps even when the mesh is partially hidden.
* The “Show Mask” option will auto-activate when applying masking in Transpose mode.
* ZBrush activation code has been updated to be less sensitive to hardware changes.
* ZBrush can now auto-group by UV Tiles even if the Tiles resides in the negative UV space.
* Fixed the 2.5D Blur brush with ZAdd mode.

source: Pixologic
i cant wait to use this software again. I'll post new updates if i take hold of this powerful 3d software, now this time i want to have a wacom bamboo so much.

Want to see an example of my 3d model? check it out here: Mud Man

For more topics like this visit Designerslandmark

Sunday, November 29, 2009

8 Useful Online Color Mixer

Having trouble finding the proper color, hex code/value for your graphic design and 3d model? I want to share my 8 useful color mixer website i found online.

If you just want to know the hex value of a single color that's not complicated fast and easy this site it for you. Just move the slider and find the color you want or just type the value in the text box. that easy.

A color schemer with suggestion close to your color
selection. Just Enter an RGB or HEX value, or click on the Color Palette.

3.) Color Scheme Designer
Enhanced scheme creation system, with color wheel interface and adjusting scheme for mono, complement, triad, tetrad, analogic and accented analogic color wheel combiner.

Brows color palettes, or create your own. Adjust, mix and blend to your content in 3d rotating color wheel. how cool is that!


5.) Kuler
Adobe has never forget to surprise us with its creative ideas for graphic designers like us, you can select from a wide variety of color ideas, mood and schemes.

This online color mixer has the power to select color that matches from your image of choice just by entering the Url , from Dull or vibrant color, with its hex value.

7.) Colr
This one is the same with degraeve, where you can get color from images but this one has the integration with flicker photos, url images and you can send pictures from your computer as well.

Just like from Adobe Kuler, whether for ad campaigns, product design, or in architectural specification, compare color palettes, submit news and comments, and read color related articles and interviews.

Most of the website can be save for your design software's palette like Adobe collection,

For more topics like this visit Designerslandmark

Electric Rain Swift 3D v6.0.893 review


One of my favorite 3d software has updated its version to swift3d v6. This tool is so easy to integrate with Adobe Flash, for its power to create 3d vector and 3d model in easy way plus the animation is just like flash timeline. This is also the first 3d software that i learn to use. I Can't wait to use this again. It never fails me forget to surprise me with its new updates.

check out the new updates :


V6 - Our Most Powerful Modeler

That's right - Swift 3D v6 introduces a very simple but extremely powerful Boolean primitive to our modeler, which allows you to combine or punch holes through objects using other 3D objects in your scene. It's all non-destructive, allowing easy editing and unlimited possibilities.
  • New Upgrade Features in v6
  • Boolean Operations Support
  • 5X Faster Raster Rendering Speed
  • New Texture Mapper
  • Multiprocessor Support (5X Faster)
  • Papervision3D v2 Support
  • Background Image Tracing
  • Extrusion & Lathe Editor Multi-Path Support - Draw multiple unique paths
  • Clone & Arrays Support
  • Bump Map Texture Support
  • Soft Shadow Support
  • Enhanced Camera Controls
  • Expanded User Preferences

I will post updates if ever i will have this software and some 3d models. ^_^

For more topics like this visit Designerslandmark

Wednesday, November 25, 2009

Create multiple objects with equal spacing in sketchup 6 and 7

In this 3d tutorial i will show you how to create multiple copy of your object with given equal spaces in sketchup, for your 3d model

1.) Open Sketchup. (Im using SU 6 and SU 7, dont know if it works in older versions)
2.) Create an object, ill be using a box for this example.


3.) Select / highlight your object. (i group my object in this example) (note: it doesn't matter if you group it, make it component, or leave it as is.)


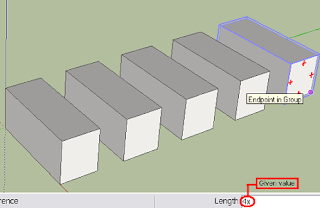
4.) Grab your move tool and create a copy of it by how far you want the distance per-objects. (i use 5' as my distance)


5.) After you have specify the distance, type in the value of how many copy including the the last objects including "x", with x means multiply by. don't forget to put the "x". (ill be using 4 as my example.) (note: im poor with math but this is how the computation happens, 4x1+1. which 4 as the Assign value.)


That's it, you made it. as simple as that. Hope this help and understand it to. Good luck.
___________________________________________________
additional information, if you want to create a horizontal alignment or any directions, in move tool(4), if you assign it vertical, horizontal or diagonal it will still copy the same exact position you assign to it. (pls. see example)


For more topics like this visit Designerslandmark